
Are your hearing aids not performing as well as they used to? Are you experiencing muffled or distorted sounds? It’s time to give your hearing aids some much-needed care and attention!
Just like any other valuable device, the best hearing aids require regular cleaning and maintenance to stay in top working condition. In fact, proper care can extend the lifespan of your hearing aids and ensure optimal performance.
So, let’s dive into how to clean and care for your hearing aids, and keep them in pristine condition for years to come.
Table of Contents
How to Clean Hearing Aids: The Basics
To keep your hearing aids in top working condition, it’s essential to establish a regular cleaning routine. Let’s explore the basics of daily and weekly cleaning:
Daily Cleaning Basics
- Wipe Down the Exterior: Use a soft, lint-free cloth to gently wipe the exterior surfaces of your hearing aids. This removes any dirt, oils, or debris that may have accumulated throughout the day.
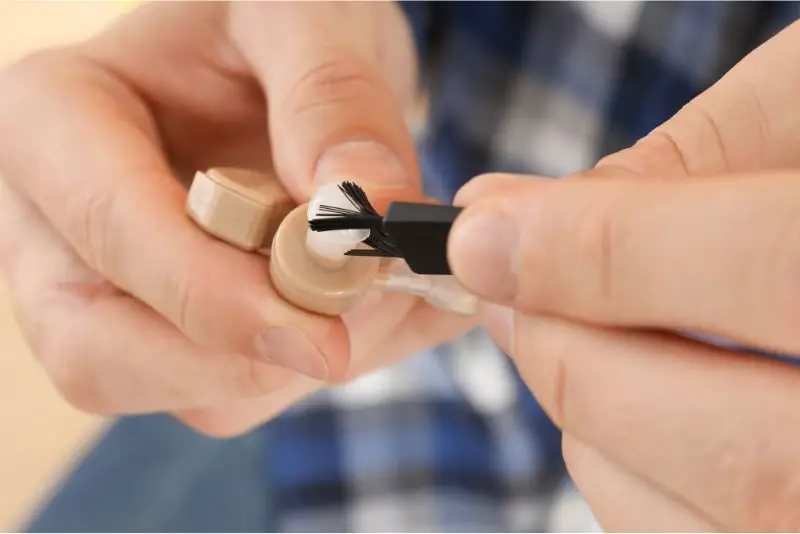
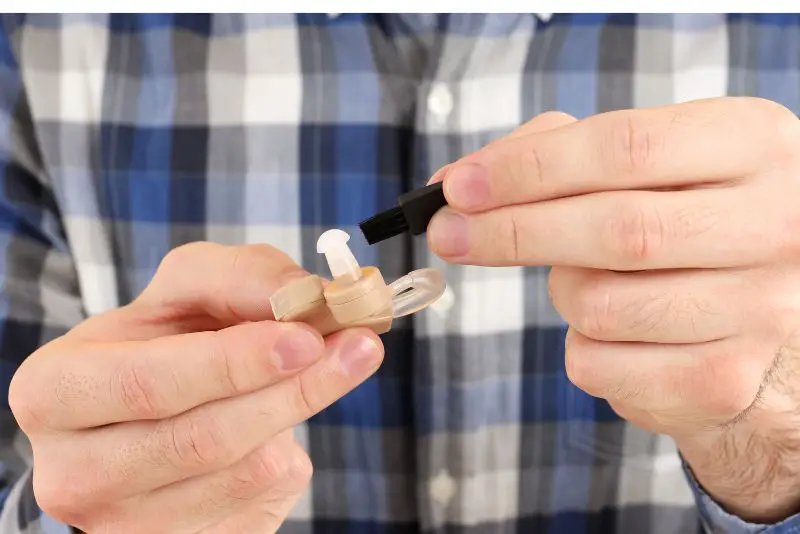
- Check for Wax Buildup: Inspect the microphone ports and receiver openings for any signs of wax buildup. If you notice any wax, use a wax removal brush or wire loop to carefully clean these areas.
- Replace Filters: Some hearing aids have filters that need regular replacement. Check your hearing aid manual to determine if your device requires filter changes and follow the manufacturer’s instructions for replacement.
Weekly Detailed Cleaning
- Remove Wax and Debris: Take extra care to thoroughly clean the microphone ports, receiver openings, and any other crevices using the appropriate tools like a wax removal brush or wire loop. This ensures that sound can flow freely and prevents any blockages.
- Clean Earmolds (if applicable): If you have earmolds, remove them and clean them separately using mild soap and water. Rinse them thoroughly and allow them to dry completely before reattaching them to your hearing aids.
- Inspect Tubing (if applicable): If your hearing aids have tubing, inspect it for any signs of blockage or damage. Use a vent cleaner or a small wire to clear any debris or wax that may have accumulated.
- Check Battery Compartment: Open the battery compartment and inspect it for any signs of corrosion or debris. If necessary, clean the compartment with a dry cloth or a cotton swab, taking care not to damage the contacts.
Cleaning Instructions for Different Hearing Aid Styles
Different hearing aid styles require slightly different cleaning techniques. Let’s explore the specific cleaning instructions for three common hearing aid styles: in-the-ear (ITE), behind-the-ear (BTE), and receiver-in-the-canal (RIC) hearing aids.
How to Clean Behind-the-Ear (BTE) Hearing Aids
- Detach the Earhook or Tubing: If your BTE hearing aid has an earhook or tubing, detach it from the main body of the device. This makes it easier to clean both components separately.
- Clean the Earhook or Tubing: Use a mild soap and water solution to clean the earhook or tubing. Rinse it thoroughly and allow it to dry completely before reattaching it to the hearing aid.
- Wipe the Main Body: Use a soft cloth or a tissue to wipe the main body of the BTE hearing aid. Pay attention to the microphone ports and any other areas where wax or debris may accumulate.
- Inspect and Clean the Earpiece: If your BTE hearing aid has an earmold or custom earpiece, remove it and clean it separately using mild soap and water. Rinse it thoroughly and allow it to dry before reattaching it.
How to Clean In-the-Ear (ITE) Hearing Aids
- Remove the Hearing Aid: Gently remove the hearing aid from your ear and hold it over a soft surface, such as a clean cloth or towel, to prevent any damage if dropped.
- Wipe the Surface: Use a soft cloth or a tissue to wipe the surface of the hearing aid, removing any visible dirt or wax. Be careful not to apply excessive pressure that could damage the device.
- Clean the Sound Outlet: Use a wax removal brush or wire loop to clean the sound outlet or microphone port. Be gentle and avoid pushing any debris further into the device.
- Inspect the Vent: If your ITE hearing aid has a vent, use a vent cleaner or a small wire to clear any wax or debris that may be blocking it. This helps ensure optimal sound quality.
- Replace the Wax Filter: If your ITE hearing aid has a wax filter, check it regularly and replace it as recommended by the manufacturer. Follow the instructions provided to properly insert the new filter.
How to Clean Receiver-in-the-Canal (RIC) Hearing Aids
- Remove the Dome or Eartip: RIC hearing aids have a dome or eartip that fits into the ear canal. Carefully remove the dome or eartip from the device for cleaning.
- Clean the Dome or Eartip: Use a tissue to roll the dome gently between your thumb and forefinger. Do not use a liquid cleaner or water and ensure it is completely dry.
- Check the Wax Filter is Clear. Depending on the type of wax filter, you may be able to gently brush any loose wax away.
- Re-attach the Dome. Push it onto the receiver end until it is secure.
- Wipe the Main Body: Use a soft cloth or a tissue to wipe the main body of the RIC hearing aid, paying attention to the microphone ports and any other areas that may collect wax or debris.
- Check the Receiver: Inspect the receiver, which is the small component at the end of the tubing, for any signs of wax or blockage. Use a wax removal brush or wire loop to clean it gently if necessary.
Always refer to the specific instructions provided by the manufacturer for cleaning your particular hearing aid model. Following these cleaning instructions will help ensure that your hearing aids stay in optimal condition and provide you with the best possible hearing experience.
Precautions and Professional Assistance
Read the manual
It’s essential to familiarize yourself with your hearing aid’s manual. This will provide valuable insights into the specific cleaning instructions and precautions recommended by the manufacturer. Each hearing aid model may require slightly different care, so it’s crucial to follow the guidelines provided in the manual.
Ask a Professional
While it’s possible to clean your hearing aids at home, it’s always a good idea to consult with a hearing healthcare provider. These professionals have the expertise and knowledge to guide you through the cleaning process and address any concerns or questions you may have.
Regular visits to a provider for cleaning and check-ups are essential to ensure that your hearing aids are functioning optimally. Providers can conduct thorough cleanings and inspections, identify any issues, and make necessary adjustments to improve your hearing experience.
Hearing Aid Cleaning Tools
To keep your hearing aids in pristine condition, you’ll need a few essential tools specifically designed for their cleaning and maintenance. These tools are readily available and easy to use. Let’s take a look at some common tools for cleaning hearing aids and explore recommended cleaning kits and alternative cleaning items.
Common Tools for Cleaning Hearing Aids
- Wax Removal Brush: A small brush with soft bristles is perfect for gently removing wax and debris from the nooks and crevices of your hearing aids. It’s important to use a brush specifically designed for hearing aids to avoid damaging the delicate components.
- Cloth: A soft, lint-free cloth is ideal for wiping down the exterior of your hearing aids. This cloth should be used to remove any visible dirt or smudges on the surface of your devices. Avoid using abrasive materials that could scratch the casing.
- Wax Pick/Wire Loop: These small tools are excellent for removing stubborn wax or debris from the microphone ports, receiver openings, and other hard-to-reach areas. Be careful when using these tools and follow the manufacturer’s instructions to prevent any damage.
- Vent Cleaner: Some hearing aids have tiny vents that allow air to flow in and out. These vents can become clogged with wax or debris over time, affecting the sound quality. A vent cleaner, usually a thin wire or brush, can help you clear any blockages and ensure proper airflow.
Recommended Cleaning Kits and Alternative Cleaning Items
Comprehensive Cleaning Kits
While individual tools can be useful, investing in a comprehensive hearing aid cleaning kit is a great way to ensure you have everything you need in one convenient package.
These kits often include a combination of the tools mentioned above, along with additional items like cleaning solutions and drying containers. Look for kits specifically designed for your hearing aid style and consult with your provider if you’re unsure which kit is best for you.
Alternative Cleaning Items
If you prefer to use alternative cleaning items, there are a few options to consider. A soft-bristle toothbrush can be used as a substitute for a wax removal brush or vent cleaner. Just make sure it’s clean and dedicated solely to your hearing aids.
Disinfectant wipes can come in handy for cleaning the exterior surfaces of your devices, but be sure to use alcohol-free wipes to avoid any potential damage. For general cleaning, an alcohol-free cleaner, specifically formulated for hearing aids, is a safe and effective option.
Remember, it’s important to follow the manufacturer’s guidelines when selecting cleaning products and tools to ensure that you don’t unintentionally harm your hearing aids.
Handling and Care Tips
It’s crucial to treat your hearing aids with the delicacy they deserve. These devices are intricate and contain sensitive parts that require special attention. Follow these tips to ensure safe cleaning and maintenance:
Delicacy of Certain Parts, such as the Microphone and Receiver
The microphone and receiver of your hearing aids are particularly delicate components that need extra care. Avoid touching them with your fingers or any sharp objects, as this can damage or dislodge them.
Instead, use the appropriate tools, like a wax removal brush or a cloth, to clean these areas gently. When cleaning the microphone ports, be sure to remove any wax or debris carefully, as blockages can lead to reduced sound quality.
General Tips for Safe Cleaning and Maintenance
- Wash Your Hands: Before handling your hearing aids, always wash your hands thoroughly to remove any dirt, oils, or lotions that could transfer onto the devices. This helps prevent any potential damage or contamination.
- Avoid Moisture: Moisture is the enemy of hearing aids. Remove your devices before showering, swimming, or engaging in any water-related activities. Additionally, be cautious of excessive perspiration, and try to keep your hearing aids dry at all times.
- Keep Them Away from Heat: High temperatures, such as direct sunlight or heating vents, can damage the delicate electronics in your hearing aids. Store them in a cool, dry place when not in use, and avoid leaving them in hot cars or exposed to extreme heat.
- Remove Batteries: When not using your hearing aids for an extended period, such as overnight, remove the batteries to prevent any potential corrosion. This will help preserve the lifespan of your batteries and prevent damage to the hearing aids.
- Store Properly: Invest in a drying container or dehumidifier to store your hearing aids overnight. These devices can help remove any excess moisture and ensure that your hearing aids are ready for use the next day.
Additional Tips and Resources
In addition to the regular cleaning and maintenance of your hearing aids, there are a few extra tips and resources that can further enhance their longevity and performance. Let’s explore these additional tips:
Battery Compartment Maintenance
Regularly check the battery compartment of your hearing aids for any signs of corrosion or debris. If you notice any buildup, carefully clean the compartment using a dry cloth or a cotton swab. Keeping the battery compartment clean and free from dirt or moisture can help ensure proper functioning of your hearing aids.
Care and Cleaning of Earmolds
If your hearing aids have earmolds or custom earpieces, it’s important to clean them regularly to maintain optimal hygiene and sound quality. Use mild soap and water to clean the earmolds, rinse them thoroughly, and allow them to dry completely before reattaching them to your hearing aids.
The Importance of Regular Cleaning and Care
Regularly cleaning and caring for your hearing aids is crucial in maintaining their optimal performance and longevity. By following the specific cleaning instructions for your hearing aid style, using the recommended tools, and seeking professional assistance when needed, you can keep your hearing aids in top working condition.
Remember to establish a daily cleaning routine and perform more detailed cleanings on a weekly basis. With proper care, your hearing aids will continue to provide you with clear and vibrant sound for years to come.
FAQs
Can I use alcohol wipes to clean my hearing aids?
It is best to avoid using alcohol wipes on hearing aids since alcohol can damage the hearing aid components and cause cracks or discoloration in the plastic parts.
How do you dissolve ear wax from hearing aids?
You can dissolve earwax from hearing aids by using a soft-bristled brush to gently remove visible wax debris from the hearing aid and utilizing wax dissolving solutions or drops to break down the impacted build-up.
Should you clean hearing aids with soap and water?
Soap and water can damage hearing aids, so it is recommended to use specialized cleaning kits for hearing aids to clean and maintain their condition.
Can you use hydrogen peroxide to clean hearing aids?
Hydrogen peroxide is not recommended for cleaning hearing aids as it is abrasive and can be harmful to the hearing aid components.
What are other useful hearing devices?
Check out our comprehensive guide to Understanding a Variety of Hearing Devices.
